Showing posts with label monica. Show all posts

Sunday, March 1, 2020

hand painted heart and diamond ring bridal party cookies


Sometime last summer, my friend Monica asked me to make bachelorette party cookies to go inside of goody bags that she was putting together. She was the Matron of Honor for her little cousin, and they were going to be travelling to Cabo for the party. She wanted a pink and gold theme, and wanted to customize the cookies with the names of each of the ladies. We ended up deciding on heart cookies and engagement ring cookies, each decorated with pink roses and greenery, with one white heart cookie for the bride and the rest of the cookies pink. This was definitely going to be a fun cookie project!


For the engagement ring cookies, I used a cutter from Cookie Cutter Kingdom, and my favorite sugar cookie and royal icing recipes (which you can find in my book, The Hello Kitty Baking Book!). Once the cookies were baked and cooled, I started to decorate with white icing for the diamond, and finished with gold icing for the ring (tinted with Americolor gold gel-based food coloring). For a tutorial on how I did this, you can see my previous engagment ring cookie post here.


Then I finished by using pink stiff icing to pipe tiny rosettes, followed by stiff green icing to pipe green leaves (using this leaf tip).


I thought they turned out pretty cute, and the rosettes and leaves added a nice feminine touch.


For the heart cookies, I used this heart cookie cutter set (which I also used for these lovebird wedding favor cookies and these lovebird bridal shower cookies).


Even though I only needed one white heart cookie for the bride, I made several in case I messed up on painting her name!


For the gold letter painting, I used a combination of gold luster dust mixed with clear vanilla extract to form a "paint", and then used a food-safe brush to paint the caligraphy names.


I loved the combination of the rings and hearts together! 


Happy Bachelorette Party, Victoria!


Sunday, February 24, 2019

unicorn cupcakes


Sometime last year, my friend Monica asked me to make unicorn cupcakes for her goddaughter. She wanted pastel swirl frosting, topped with little fondant unicorn horn toppers. We decided that I'd make chocolate cupcakes with cream cheese frosting, and I bought gold cupcake liners to match the gold unicorn horns!

About a week in advance, I started making the fondant toppers, in order to give them time to dry out. I tinted my fondant with gold gel-based food coloring, and then brushed on gold luster dust to give it a shiny gold sheen. I also made little ears for the unicorns, using a petunia flower cookie cutter (similar to this one) and then cutting out the petals to make ears.


Then when it was time to bake the cupcakes, I made my favorite chocolate cupcake batter (recipe in my book, The Hello Kitty Baking Book!), and baked them in my new shiny gold cupcakes liners. Once they were cool, I whipped up some cream cheese frosting (recipe also in my book!) and divided it into three portions. Then I tinted each portion with yellow, pink, and green (with a teeny bit of blue in it, to give it more of an aqua feel).


Then I fitted a pastry bag with a large star tip, and when filling the pastry bag, I filled it with all three colors of frosting, to give it that swirl effect.


These colors make me so happy!


Then it was time to add my fondant decorations. I placed a unicorn horn in the middle, with ears on either side.


Cute, right?


I hope Monica's goddaughter enjoyed them as much as I enjoyed making them! Happy Birthday!


Sunday, February 25, 2018

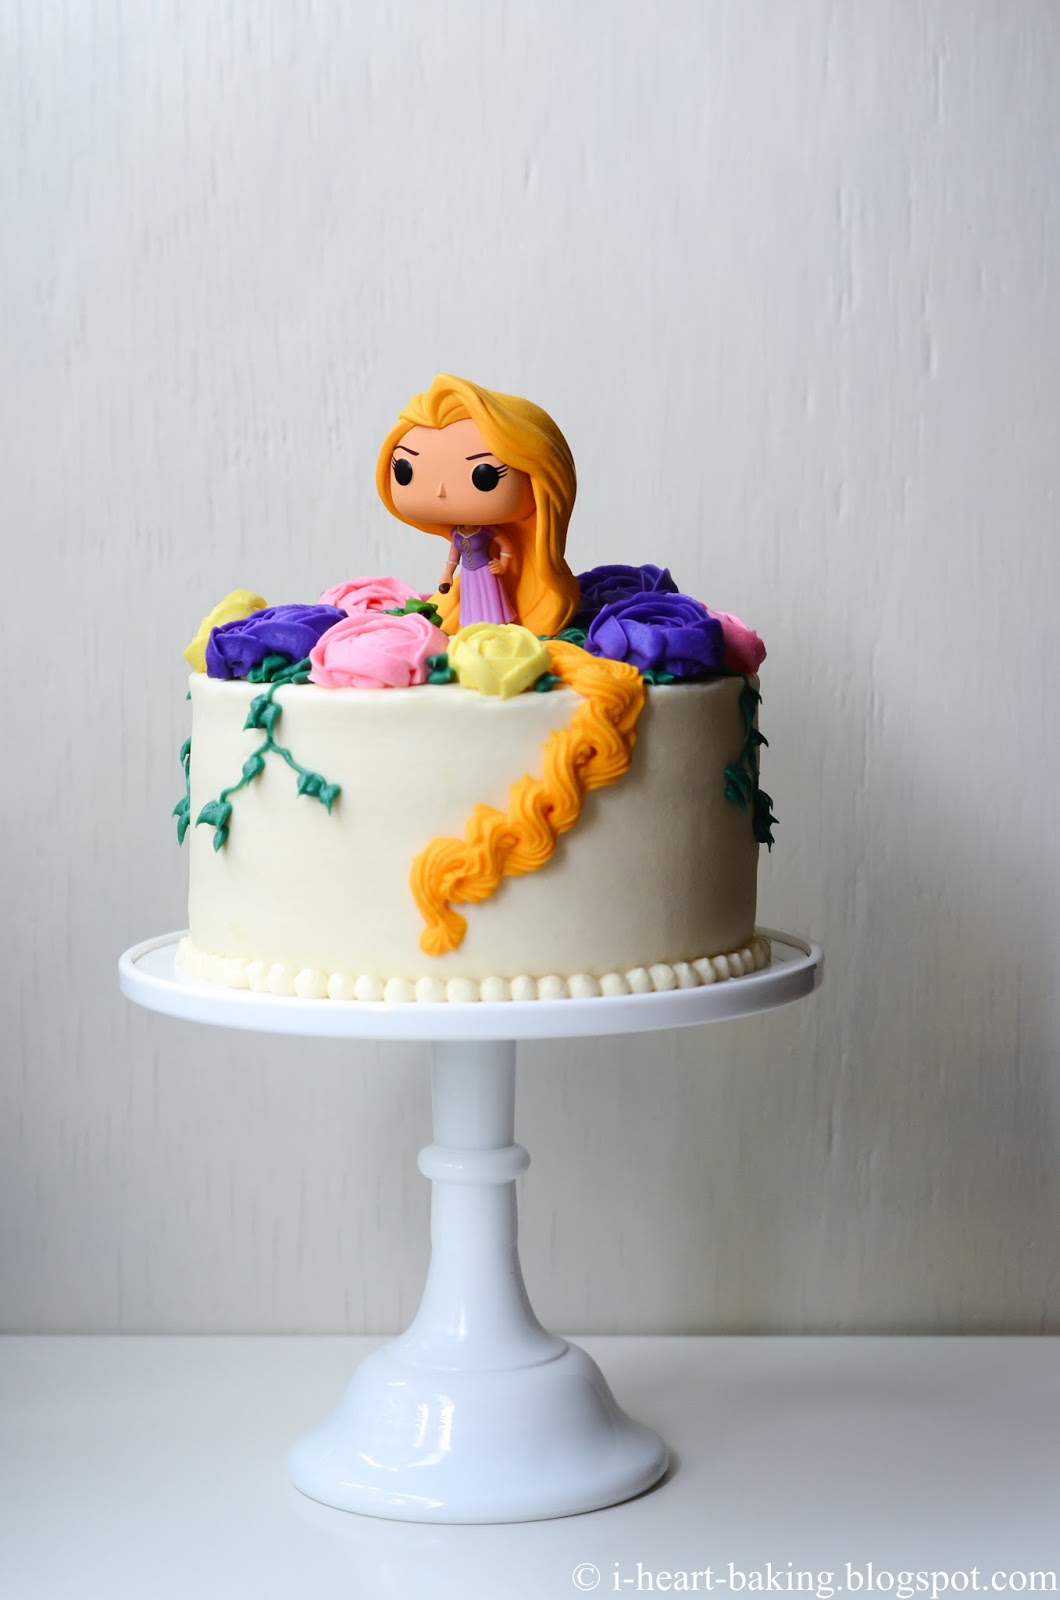
tangled rapunzel birthday cake with buttercream flowers


I've baked a lot of fun goodies for my friend Monica over the past few years, including pool party piggy cookies and a piggy cake, a chevron gender reveal cake, graduation cap cookies, a Hello Kitty pom pom cake, a circus carnival baby shower cake, and teapot cookies, but this one has to be my favorite so far! Her daughter absolutely loves the movie Tangled, so she asked me to make her a Tangled Rapunzel cake for her birthday! After discussing a few options, we decided that we would use this adorable Funko Pop Rapunzel doll as the cake topper, and I would continue Rapunzel's long hair down and around the cake. 

As for the cake itself, she chose a vanilla cake with lemon whipped cream and fresh blueberries. So I baked up my favorite vanilla cake (recipe in my book, The Hello Kitty Baking Book!) in two 8-inch round cake pans, and baked them at 350F until golden brown. 


Once cooled, I sliced them in half horizontally, giving me four layers, and then topped each layer with fresh whipped cream (spiked with fresh lemon zest and lemon juice) and fresh blueberries.


Then I whipped up a batch of cream cheese buttercream, and covered the top and sides of the cake with it.


I usually do a quick crumb coat of frosting, let it chill in the fridge for 30 minutes or so, and then do a final coat of frosting, smoothing out the sides with a long metal spatula while using a long offset spatula for the top.


Then I piped a neat beaded border along the bottom, using a disposable pastry bag fitted with a medium round tip.


Next came the Rapunzel topper, which I attached with a bit of frosting on the bottom.


Then came buttercream flowers, which I had piped in advanced onto pieces of waxed paper, and then chilled in the freezer until they were hard and easy to handle.


For Rapunzel's hair, I tinted some frosting with golden yellow gel-based food coloring, and then used a star tip to pipe her long hair down and around the side of the cake.


I also used forest green tinted frosting and a leaf tip to pipe some leaves in between the buttercream flowers.


And then final step was to pipe long branches of ivy leaves down the sides of the cake as well.


Seriously, one of my favorite cakes to make so far!


Hope you enjoyed your cake and had a fantastic birthday, Viviana!


Sunday, February 28, 2016

teapot tea party cookies with brush embroidery flowers


Sometime last year, my friend Monica asked me to make teapot cookie favors for her daughter's afternoon tea themed birthday party, and after collaborating back and forth over text, we decided to go with pink and blue teapot cookies with brush embroidery flowers!

I started by making my favorite sugar cookies (recipe in my book, The Hello Kitty Baking Book!) and cutting out the cookies with a teapot cookie cutter. After baking them and letting them cool, I whipped up a batch of royal icing (recipe also in my book!). Using gel-based food coloring, I tinted a portion of the icing pink (using Americolor soft pink), another portion blue (using Americolor sky blue), and left the last portion white. Then with stiff pink icing in a disposable piping bag and a small round tip, I outlined half of the cookies in pink ...


... and then filled them in with runny pink icing.


Then I did the same with the other half of the cookies except with blue icing. Once the icing had dried for several hours, I was ready to pipe on the details, including the brush embroidery. This is a technique where you pipe an outline with stiff icing, and then use a (slightly damp) food-safe brush to drag the edges of the outline towards the center, giving a cool painted effect.

Here's how it looked with just the outline of the flower and accompanying leaf:


And here's how it looked after I used a brush to drag the edges towards the center. I also added a few dots of stiff white icing in the center of each flower.


After letting the brush embroidery and details dry, they were done!


Enjoy!