Showing posts with label mini tarts. Show all posts

Sunday, November 5, 2017

mini blueberry cheesecake tarts


I was so enamored with the little chocolate cookie crusts from my previous post, I made them again for my second day of Thanksgiving "Harvest Potluck" at my kids' school last year. (The first day was for my oldest son, the second day was for my daughter, as they have their potlucks on different days). This time, instead of using the cookie crusts for mini chocolate cream pies, I turned them into mini blueberry cheesecake tarts! 


You can check out my previous post on how I made the cookie crusts, but for this filling I made a no-bake cheesecake type of filling. I've made it before for large tarts (such as this flag tart and this father's day tart), and the filling worked just as well for mini tarts. (You can find the recipe at Martha Stewart's website.)


After using a disposable pastry bag to pipe the filling into each cookie crust, I topped them with fresh blueberries. So simple and easy!


The final step was a light dusting of powdered sugar.


This cookie crust and filling combo is so versatile, you could top them with any fresh fruit, or even a drizzle of salted caramel or chocolate ganache instead of fruit would be delicious!


These little tarts are the perfect portable dessert for potlucks or picnis, and elegant enough to serve at dinner parties as well! Enjoy!


Sunday, October 22, 2017

mini chocolate cream tarts


Every year before Thanksgiving, my kids' school has a "Harvest Potluck" to celebrate, where parents sign up to bring food and desserts and have a nice luncheon with their kids. It's a really nice event and I love going every year! Last year, I signed up to make dessert, and decided that I wanted to make little mini chocolate cream tarts.


Upon searching for mini chocolate cream pie recipes, I ended up using this one at Flour Arrangements and thought they were so darn cute! I loved the scalloped shape of the mini pie crusts! They're made by rolling out what is essentially a chocolate sugar cookie dough, and then using a flower shaped cookie cutter to cut out the shapes, before fitting them into a cupcake tin to bake.

Two things that I learned while making these - a) the chocolate sugar cookie dough was much to wet for me to roll out, so I ended up adding more flour. But the end result was a not-so-tender crust, and lacked the chocolate flavor that I was craving, so next time I think I'll try using Thomas Keller's homemade oreo (TKO) cookie dough recipe. And, b) it's easiest to roll out the cookie dough while the dough is sandwiched between two sheets of parchment paper, otherwise you will need to add flour to the rolling pin and this will leave white splotches all over your beautiful dark brown cookie crusts!


After the cookie crusts were baked and cooled, I filled them with the chocolate cream (essentially a chocolate pudding). Again, I thought the chocolate cream lacked the chocolate "punch" that I was craving, so next time I'll go back to my dark chocolate pudding recipe instead.


After letting the chocolate pudding set in the fridge, I piped little dollops of freshly whipped cream on top, in a cute little pattern to resemble the inside of a flower.


And finally, I dusted each tart with a rich unsweetened cocoa powder.


I thought they turned out super cute!


Even though I thought these could have used a more chocolatey crust and filling, they were a hit at the potluck!


These little treats are perfect for any potluck, or even Thanksgiving dessert itself! Enjoy!


Sunday, February 5, 2017

dark chocolate tartlets with pretzel crust and rose peppercorn sea salt


A few weeks ago, we invited our neighbors over for a casual last-minute BBQ, and as we were prepping the food I realized that we didn't have anything for dessert! I instantly thought about using the adorable baking and dessert salts that Expertly Chosen had sent me a couple of months ago! I thought a simple and quick dark chocolate tart would be the perfect thing to use them on, and since I love dark chocolate-covered pretzels (especially the ones at Trader Joe's!), I decided to make a simple pretzel crust to go with it.


With a quick online search, I found this pretzel crust recipe from Betty Crocker, which sounded perfect! So I ground up the pretzels in my food processor with sugar, and then poured in melted butter to bring it together. (Although in the future, I would probably add a little bit more butter to hold it together better).


Then I scooped the pretzel mixture into mini tart tins, and pressed it into the bottom and sides of the tins. (I used 4-inch tart tins, and was able to get 9 mini tart crusts out of the pretzel mixture). I baked them at 350F for about 10 minutes just to set them a bit, and then set them aside to cool.


For the chocolate ganache filling, I used this recipe from Sweetapolita (just the ganache part), except I had to double the recipe to be able to fill all 9 tarts. Then I sprinkled on my flavored salts.


For the BBQ, I had sprinkled on the "espresso salt", which went nicely with the dark chocolate. But the next day, I had two leftover tarts that I hadn't added the baking salt to yet, and I thought I would try another flavor. I ended up choosing the "rose peppercorn salt", mainly because I thought the dried rose petals were so pretty (and also how cute would these rose petal tarts be for Valentine's Day?)!


The rose peppercorn salt gave the tarts a delicately flowery yet peppery flavor, which also went quite well with the dark chocolate. And honestly, I think every one of the salts would have paired well!


With this specific set, the options include:

Vanilla Cardamom Salt
Espresso Salt
Rose Peppercorn Salt
Hibiscus Salt
Orange Ginger Salt
Vanilla Lavendar Salt


Thanks again for the baking and dessert salts, Expertly Chosen! I can't wait to try them all!


Sunday, September 11, 2016

mini apple pies


My favorite part about pie is the crust. Buttery, flakey, deliciously luscious pie crust. That said, my favorite thing about mini pies is that you get a) you get one all to yourself, and b) you get to eat more pie crust than you would with a regular slice of pie!

These mini pies use the same recipe as my regular apple pie, except you make half the recipe and end up with six individual pies instead of one big one. (Or, I suppose you could keep the recipe the same and end up with twelve individual pies, but I only have six mini tart tins so I went with half the recipe). 


Once your dough is made, formed into a disc, and has chilled in the fridge for at least half an hour, divide the disc into six equal pieces. Then roll out each one and carefully fit them into six individual mini tart tins.


Once the edges are trimmed, place your tart tins on a baking sheet. Be sure to keep the excess dough that was trimmed - form it into a disc, wrap it in plastic wrap again, and put it back in the fridge.


Then assemble your fresh apple filling and divide it evenly into each dough-lined tart tin.


Note that I have diced the apples for the mini pies, but you could also keep the apples in slices as you would for a single pie.


Now you can bring out that disc of excess dough that you put in the fridge earlier. Roll it out into a rectangle, about 1/8 inch thick, and use a knife or a pizza cutter (I used a fluted pastry wheel) to cut out your lattice strips.


Arrange your strips (I like to use four on each mini pie) onto each pie in a decorative way, trimming any excess, and make sure to press the ends into the edges of the tart tins.


Then brush the tops with egg wash, sprinkle on some sanding sugar, and bake them at 350F for about 45 minutes, or until the crust is golden brown.


Mmmmmmmmm.


These mini pies are perfect to bring to picnics and BBQs because they are easy to transport, don't require plates and forks (you can pick them up with your hands and eat them!), and can be made the morning of! You could also make them the night before, but the crust won't be quite as crisp.


Enjoy!

Friday, June 29, 2012

strawberry rhubarb tartlets


In my last post on my recent obsession with making rhubarb tarts, I had used a new rectangular tart pan which delivered a different aesthetic to my tart, and I loved it.  This led me to order these mini tart pans, which escalated my tart-making obsession to another level!


For the crust, I made an all-butter pie crust, divided the dough into 6 equal portions, and rolled each one into a circle and carefully lined each tartlet pan.  Then I ran my rolling pin over the tops, in order to cut off the excess dough.


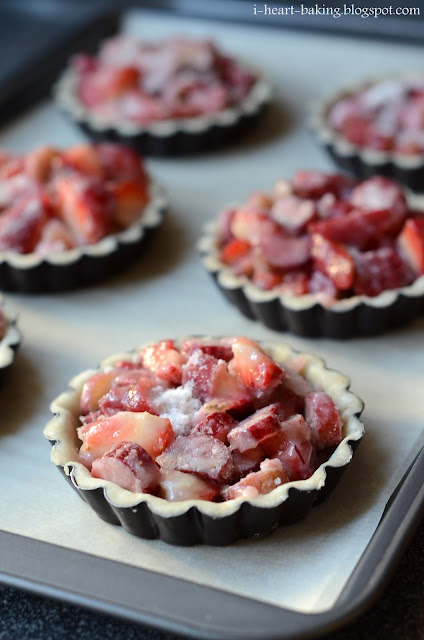
For the filling, I decided to add strawberries to my rhubarb, since I love that specific combination of flavors.  So I chopped my rhubarb and strawberries into same sized chunks, and then tossed them with sugar, flour, and a pinch of salt.


Then the tartlets were ready to be filled.  Usually I would arrange a nice pattern with my rhubarb when making regular-sized tarts, but in this case the strawberries were already starting to grow soft from the sugar and the rhubarb was chopped into chunks, and there wasn't really way to arrange them nicely.  So I just divided the filling among the prepared tartlet pans, and used a spatula to push the filling out to the edges.


After they baked for about 50 minutes, they were golden and beautiful!


They were best while still warm and fresh out of the oven!  But still good the next day as well.  The strawberries and rhubarb combined were divine, as the strawberries mellowed out the tartness of the rhubarb, and the colors together were just beautiful!


I decided that I like the mini tarts even better than one big tart, a) because the crust is even flakier and crispier - perhaps because it's a smaller amount of filling than in one large tart, and b) because you get a whole tart to yourself!