Showing posts with label bridal shower. Show all posts

Sunday, March 1, 2020

hand painted heart and diamond ring bridal party cookies


Sometime last summer, my friend Monica asked me to make bachelorette party cookies to go inside of goody bags that she was putting together. She was the Matron of Honor for her little cousin, and they were going to be travelling to Cabo for the party. She wanted a pink and gold theme, and wanted to customize the cookies with the names of each of the ladies. We ended up deciding on heart cookies and engagement ring cookies, each decorated with pink roses and greenery, with one white heart cookie for the bride and the rest of the cookies pink. This was definitely going to be a fun cookie project!


For the engagement ring cookies, I used a cutter from Cookie Cutter Kingdom, and my favorite sugar cookie and royal icing recipes (which you can find in my book, The Hello Kitty Baking Book!). Once the cookies were baked and cooled, I started to decorate with white icing for the diamond, and finished with gold icing for the ring (tinted with Americolor gold gel-based food coloring). For a tutorial on how I did this, you can see my previous engagment ring cookie post here.


Then I finished by using pink stiff icing to pipe tiny rosettes, followed by stiff green icing to pipe green leaves (using this leaf tip).


I thought they turned out pretty cute, and the rosettes and leaves added a nice feminine touch.


For the heart cookies, I used this heart cookie cutter set (which I also used for these lovebird wedding favor cookies and these lovebird bridal shower cookies).


Even though I only needed one white heart cookie for the bride, I made several in case I messed up on painting her name!


For the gold letter painting, I used a combination of gold luster dust mixed with clear vanilla extract to form a "paint", and then used a food-safe brush to paint the caligraphy names.


I loved the combination of the rings and hearts together! 


Happy Bachelorette Party, Victoria!


Sunday, November 13, 2016

wedding dress cookies with brush embroidery lace


A few months ago, an old friend of mine from college (hi, Kym!) was planning a bridal shower for a mutual friend from college (hi, Cora!), and she asked me to make wedding dress cookies for the bridal shower favors. I had actually been wanting to make wedding dress cookies for quite some time, so I happily accepted! Kym was nice enough to order me a brand new wedding dress cookie cutter from Etsy, one that matched the strapless trumpet-style wedding dress that Cora was going to wear on her wedding day.


For the cookies, I made a few batches of my trusty sugar cookie dough (recipe in my book!), and used my beautiful new cutter to cut out the shapes. After baking them at 350F for 10-12 minutes and then cooling them, I was ready to decorate with royal icing (recipe also in the book!).


First I used a pastry bag fitted with a small round tip to pipe stiff icing to outline each dress. (This helps to keep in the runny icing that you are about to fill them with!)


Then I used runny icing to fill them in, and let them dry for several hours.


Kym sent me a picture of Cora's wedding dress, which was covered in lace, so Kym and I decided that I would replicate that with some sort of lace design on the dress.  I immediately thought of these brush embroidery teapot cookies I had done a while back, and used the same technique to add a lacy design to the dress. I basically outlined my lace pattern with stiff icing ...


.. and then I used a food-safe brush to drag the wet icing into the center of the design.


I also added a lacy design to the bottom of the dress, and a beaded border to the bodice of the dress.


I loved how they turned out!


I think it would be so fun to recreate wedding dresses in cookie form, so I'm going to have to do more soon!


Happy Bridal Shower, Cora!


Hope everyone enjoyed the cookies!


Sunday, August 28, 2016

umbrella cookies


I'm back! We were away for summer break, visiting hubby's family in Hawaii - and now that we're back, it's back to reality! School for the kids, work for the adults, and of course, baking for me!

In addition to the diamond engagement ring cookies that I made for Diane in my last post, I also made umbrella cookies, in pink and sage green to match the bridal shower colors.

I searched online everywhere but couldn't find an umbrella cookie cutter that I liked, so I used Cookie Cutter Kingdom's custom cutter tool to design my own! All I had to do was draw the umbrella shape that I wanted, upload it, and voila, the perfect umbrella cookie cutter!


After the cookies were baked and cooled, I whipped up a batch of royal icing (cookie and icing recipe in my book, The Hello Kitty Baking Book), and got to work on mixing my sage green color. I ended up using two parts leaf green gel-based food coloring, with one part brown, to get the perfect color green. Then I used the green stiff icing to outline each umbrella, and then watered it down to get runny icing for filling them in.


After I let the icing dry for several hours, the final touch was using stiff white icing to pipe the umbrella details!


I also did the same for the peachy/pink umbrellas, except I used two 2 parts soft pink with 1 part orange to get the perfect shade.


Happy Bridal Shower!


Sunday, July 24, 2016

diamond engagement ring cookies


A few months ago, my instagram friend Rachel asked me to make cookies for her family friend Diane. Diane was hosting a bridal shower and she wanted engagement ring cookies, which sounded like so much fun to make, so I said yes right away!

For the ring cookie cutter, my friends at Cookie Cutter Kingdom sent me a special cutter! They normally only make the ring cutter in 3" or 4" sizes, but I asked for 3.5" and they were so nice that they obliged and made me a special one! Thanks guys!


Armed with my new cookie cutter, I baked up my favorite sugar cookie recipe (recipe in my book, The Hello Kitty Baking Book!), rolled the dough to about 1/8" thick, and cut out my cookies. (For the hole in the middle, I used the backside of a piping tip!). Then I baked them at 350F for 10-12 minutes until they were golden brown.


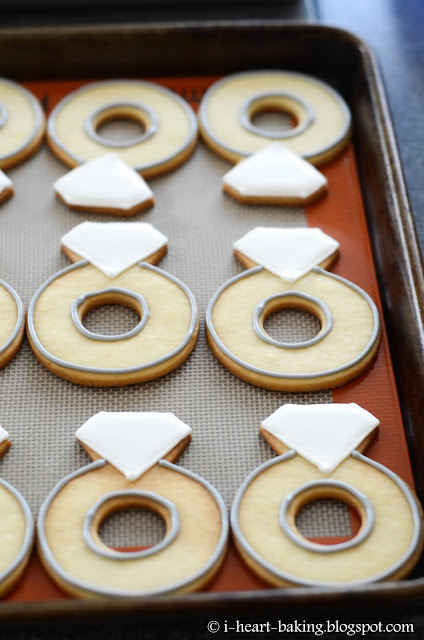
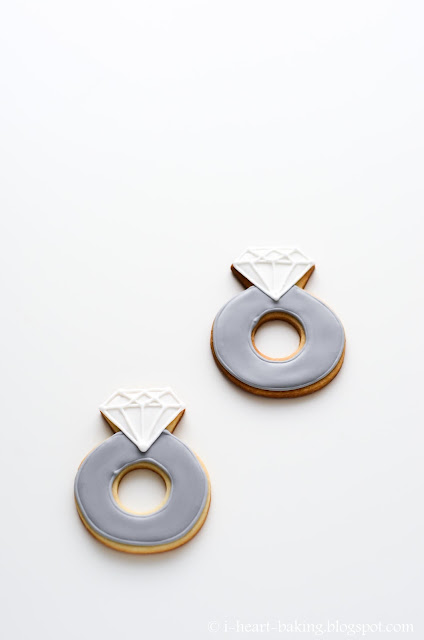
Once all the cookies were baked and cooled, I whipped up a batch of royal icing (recipe also in my book!) and used stiff icing to outline the diamond part of the engagement ring. Then I filled it in with runny icing.


For the band part of the ring, I did the same thing with gray icing (outline with stiff icing, and fill with runny icing).


Then once the icing was dry (I like to let it dry overnight), I used more stiff white icing to pipe the details onto the diamond.


I thought they turned out pretty cute!


Happy Bridal Shower!!!