Showing posts with label cindy. Show all posts

Sunday, May 28, 2017

monkey baby shower cake


I can't believe that I'm only now writing about this baby shower cake that I made for my friend Cindy my last year, and next week her baby is turning ONE already! How fast time flies!


Since the baby would be born in the Year of the Monkey, she wanted a monkey cake, so a few weeks before the baby shower I started making a little fondant monkey for the topper. To see the steps, you can check out this monkey cake that I made previously, except this time I added a little pink fondant bow!


For the cake itself, I made a 6-inch vanilla cake, filled with freshly whipped cream and fresh sliced strawberries (sorry, forgot to take pictures!) and then frosted it with pink cream cheese buttercream. I usually do a quick crumb coat, then let it chill for 30 minutes in the fridge, and then do a final coat, smoothing it out with an offset spatula.


To finish it off, I piped a white beaded border along the bottom, and the baby's name, Kailie, along the side of the cake.


And then it was time to add the fondant monkey topper!


I added a little buttercream to the bottom of the monkey topper, just to secure it in place.


Hope you enjoyed your baby shower, Cindy!

Sunday, June 28, 2015

giraffe baby shower cake


A few months ago, my neighbor and good friend Cindy was helping to plan a baby shower for one of her friends, and she asked me to make a small baby shower cake for the dessert table. It wouldn't be for the the 100+ guests to eat, rather a little cake for the parents-to-be to bring home and enjoy. Since the baby shower theme colors were yellow and gray, we decided on a 6-inch yellow cake with gray letters and piped beaded border. And a little giraffe fondant topper for the top!

Inspired by the fondant work by Paola's Creations, I set out to make my fondant giraffe. I've only done a few fondant toppers in the past (an elephant with balloon, a mustached baby, and "BABY" letters), so I was excited to be making a giraffe!


First I tinted my fondant with a combination of lemon yellow and golden yellow gel-based food coloring. After kneading the coloring into the fondant to get an even tone, I roughly formed the giraffe's pieces.


For the head, I made ears and added a light brown fondant for the muzzle, and dark brown tinted fondant for the little tuft of hair. Then I used an edible food marker to add his eyes and nostrils.


Then I added dark brown fondant to the feet and a dark brown tuft of hair, and then light brown fondant for the spots and antlers. And then I could assemble it!


Isn't he cute?!


I also made some green fondant leaves for the giraffe to sit on, to add a little more color to the cake.


For the cake, we had decided on strawberry shortcake, so I baked up my go-to vanilla cake (recipe in my book, The Hello Kitty Baking Book!), cut each layer in half horizontally, and filled it with freshly whipped cream and sliced strawberries.


Then I made a batch of yellow buttercream and covered the top and sides of the cake with it.


I smoothed out the frosting out with an offset spatula, and then piped a quick beaded border along the bottom with gray buttercream.


After adding lettering and securing the fondant giraffe with a bit of buttercream, I thought it was so cute as-is that I almost didn't want to add the fondant leaves!


But in the end I added them anyway, for a pop of color.


The best thing about making fondant toppers is that the recipient can keep it indefinitely! Just wipe the frosting off of the bottom, and you can keep it on a bookshelf or something, as long as it's not in the sun and in is a cool dry place.


Hope you had a wonderful baby shower, CC and Ryan!

Tuesday, February 12, 2013

sweet pea baby shower cake


Our good friends Cindy and Kai (the same couple who I made wedding cupcake pops for a couple of years ago) were going to have a large co-ed baby shower, and asked me to make a small cake for the dessert table.  The cake would not be intended to feed the guests, rather it would just be a little cake just for Cindy and Kai to enjoy together afterwards.  They mentioned that the colors would be yellow and green, and that they would like a "sweet pea" theme, so I set out to make them a little 6-inch sweet pea baby shower cake!


For the filling, I decided on freshly whipped cream and sliced strawberries, since I know Cindy likes her desserts on the lighter side and not too sweet.


For the cake, I made two 6-inch chocolate cake layers - the layers came out rather tall, so I decided to split them in half, giving me 4 chocolate cake layers.


Then I whipped up a batch of cream cheese buttercream, colored the majority of it a golden yellow, did a quick crumb coat of frosting, and then covered the sides with a basketweave design using a Wilton #47 tip.


After mixing all the frosting colors that I would need for my sweet pea design (chocolate brown, green, darker green, and ivory for a flesh tone), I piped the sweet pea in the middle of the cake, followed by a congratulations message in chocolate brown frosting.


The baby shower was a blast; there were lots of games and activities, and they had a mix of all their favorite foods and desserts.


My favorite part was the hands-free baby bottle beer drinking contest!


Congratulations Cindy and Kai!  Thanks for inviting us to celebrate with you, and I hope you enjoyed the cake!


Monday, March 19, 2012

baby shower duckie cake and cupcakes


To go along with the baby shower duckie and onesie cookies that I made a while back, I also made an 8-inch red velvet cake, one dozen chocolate cupcakes, and one dozen vanilla cupcakes.  For the red velvet, I used a recipe from Martha Stewart's "Cupcakes" book, except that I baked it in two 8-inch pans instead of making cupcakes.  Then for the filling, I whipped up a batch of cream cheese frosting and spread it onto the first layer of cake.


For the frosting, I made a batch of buttercream, and then added a stick of cream cheese to it at the end (this is my favorite frosting to use lately).  Then I tinted it lightly with sky blue coloring, to match the blue in the onesie cookies that I had made.


After first adding a "crumb coat" of frosting and letting that set in the fridge for a bit, I added another layer of frosting to the top only, and smoothed it out as well as I could with an offset spatula.  Then I piped on a basketweave design on the sides of the cake.


To finish off the basketweave design, I piped on a shell border around the top and the bottom of the cake.


Next I piped on a duckie using yellow frosting for the body, orange frosting for the beak, and brown frosting for the eyes.  I filled in the duckie body with a star tip, and used a #3 tip to pipe a swirly design for the wing.


The final touch was to pipe on a congratulations message with melted chocolate!


Since the cake would not be enough to serve the guests, I also baked one dozen chocolate cupcakes, and one dozen vanilla cupcakes.  I used the same piped basketweave design to cover half of them with blue frosting, and half of them with white frosting.  Then all of them were topped with a little piped yellow duckie, the same way I did the duckie cupcakes that I made a couple years ago.


I hope the happy parents-to-be enjoyed all of the goodies!


Tuesday, March 6, 2012

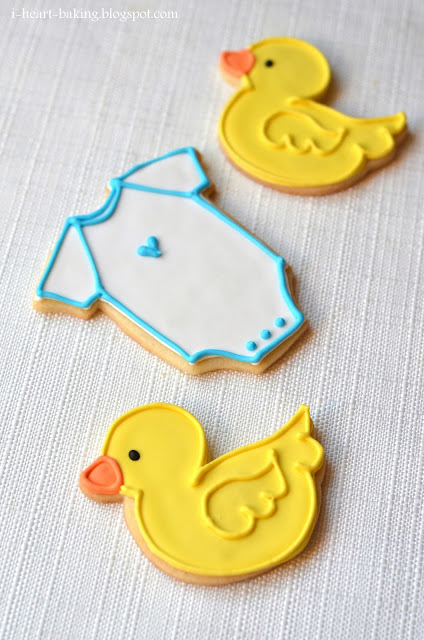
baby shower duckie and onesie cookies


My friend Cindy has a cousin who asked me to make baby shower goodies a few months ago.  We decided on an 8-inch cake and two dozen cupcakes (blog post to come later), and also duckie and onesie cookies for the favors.  I've made onesie cookies a few times before, but had not made duckie cookies yet.  Luckily, I had recently bought this animal cookie cutter set, which included a duck cookie cutter!


I used my favorite homemade sugar cookie recipe, but you could of course use store bought.  Once they were cut, baked, and cooled, I started on making my royal icing, also from the same book.  I divided the icing into separate air-tight containers so that I could mix in the colors; I would be needing white, blue, yellow, a tiny bit of orange, and an even tinier bit of black.


For the duckies, I started by piping on an outline with stiff yellow icing, leaving an empty space for the beaks, and then filled the ducks in with thinned yellow icing. Then I piped an orange outline for the beaks, and then filled them in with thinned orange icing.


After letting them dry overnight, I piped on another orange outline on top of the beaks, and then another yellow outline over the rest of the ducks.  Then I piped on the outline of the wings, and finally dotted each eye with stiff black icing.


For the onesies, I used this cookie cutter to cut out my shapes. Then once baked and cooled, I first piped an outline with stiff white icing, and then filled it all in with thinned white icing.  Once that dried overnight, I piped on an outline with stuff blue icing, as well as blue details including buttons and a little heart in the center of the onesie.


Once everything was completely dry, I packaged them in individual cellophane bags, tied with raffia and a custom favor tag.  I hope everyone at the baby shower enjoyed them!  Stay tuned for the cake and cupcakes that went along with these cookies!


*** Update: The matching baby shower cake and cupcakes can be found here!