Sunday, February 25, 2018

tangled rapunzel birthday cake with buttercream flowers


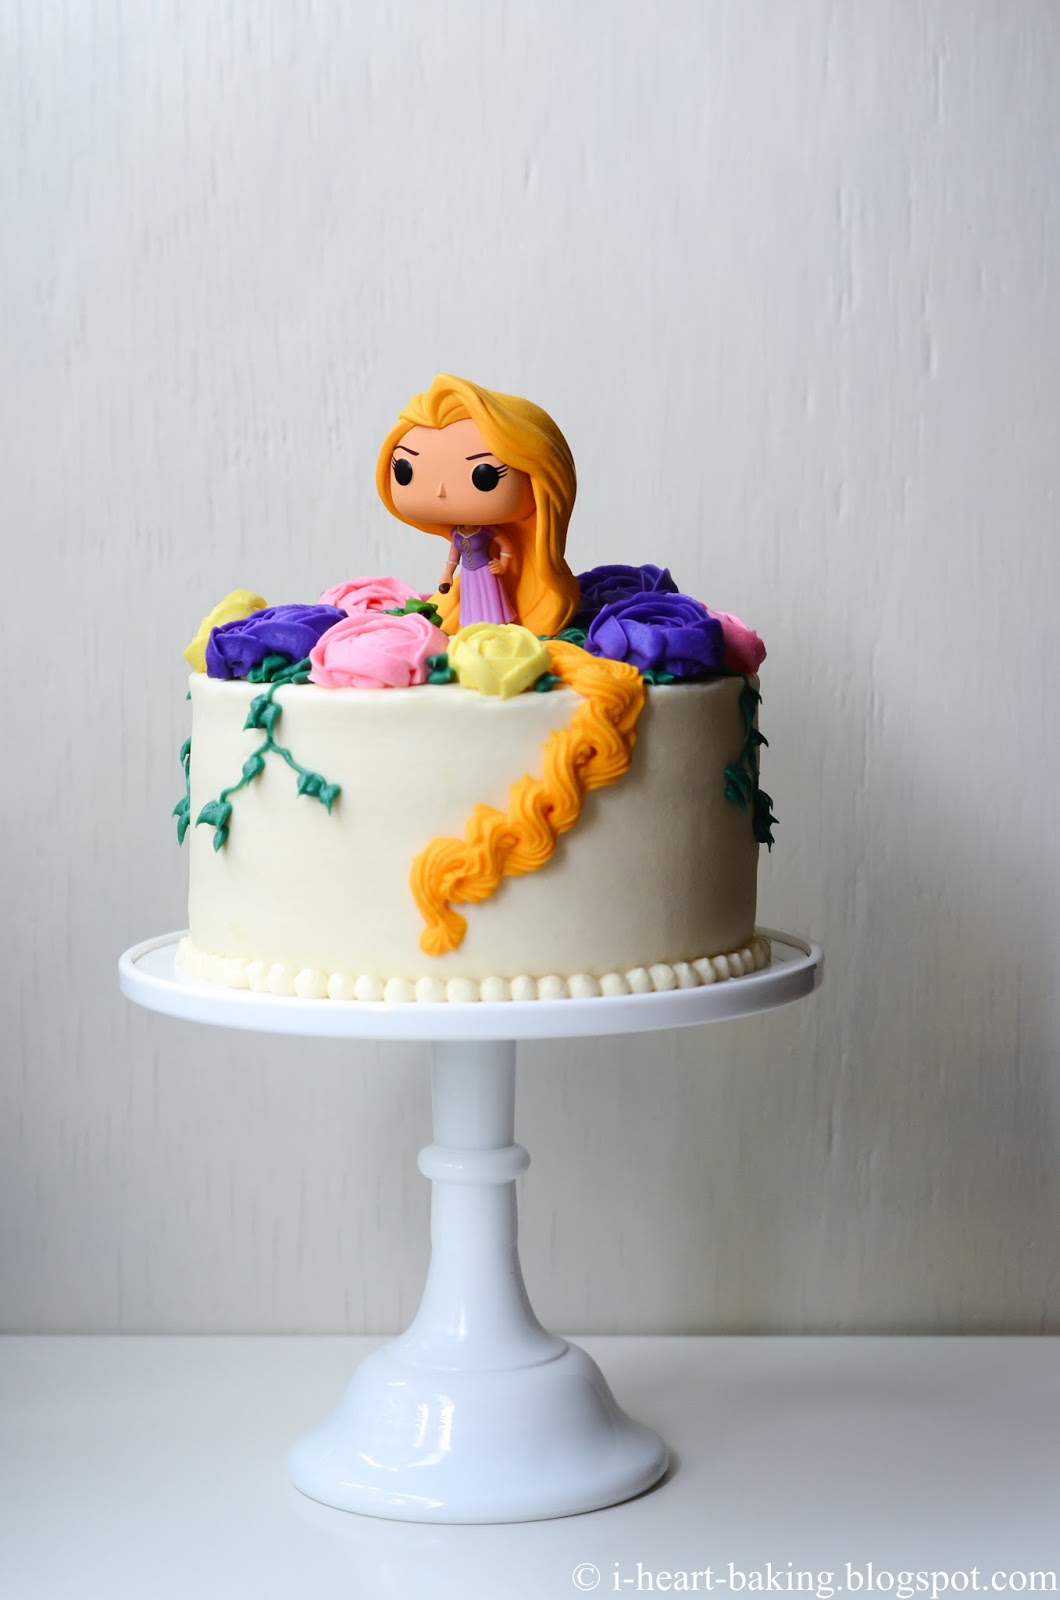
I've baked a lot of fun goodies for my friend Monica over the past few years, including pool party piggy cookies and a piggy cake, a chevron gender reveal cake, graduation cap cookies, a Hello Kitty pom pom cake, a circus carnival baby shower cake, and teapot cookies, but this one has to be my favorite so far! Her daughter absolutely loves the movie Tangled, so she asked me to make her a Tangled Rapunzel cake for her birthday! After discussing a few options, we decided that we would use this adorable Funko Pop Rapunzel doll as the cake topper, and I would continue Rapunzel's long hair down and around the cake. 

As for the cake itself, she chose a vanilla cake with lemon whipped cream and fresh blueberries. So I baked up my favorite vanilla cake (recipe in my book, The Hello Kitty Baking Book!) in two 8-inch round cake pans, and baked them at 350F until golden brown. 


Once cooled, I sliced them in half horizontally, giving me four layers, and then topped each layer with fresh whipped cream (spiked with fresh lemon zest and lemon juice) and fresh blueberries.


Then I whipped up a batch of cream cheese buttercream, and covered the top and sides of the cake with it.


I usually do a quick crumb coat of frosting, let it chill in the fridge for 30 minutes or so, and then do a final coat of frosting, smoothing out the sides with a long metal spatula while using a long offset spatula for the top.


Then I piped a neat beaded border along the bottom, using a disposable pastry bag fitted with a medium round tip.


Next came the Rapunzel topper, which I attached with a bit of frosting on the bottom.


Then came buttercream flowers, which I had piped in advanced onto pieces of waxed paper, and then chilled in the freezer until they were hard and easy to handle.


For Rapunzel's hair, I tinted some frosting with golden yellow gel-based food coloring, and then used a star tip to pipe her long hair down and around the side of the cake.


I also used forest green tinted frosting and a leaf tip to pipe some leaves in between the buttercream flowers.


And then final step was to pipe long branches of ivy leaves down the sides of the cake as well.


Seriously, one of my favorite cakes to make so far!


Hope you enjoyed your cake and had a fantastic birthday, Viviana!


Sunday, February 18, 2018

pokemon cookies


Two years ago I made these dump truck cookies for my husband's cousin Kristen, who has throwing a dump truck themed birthday party for her son, and last summer she requested Pokemon cookies for a Pokemon themed birthday party! Her son Caleb absolutely loves Pokemon, and knows all the names of the characters!

Since Kristen is back in Hawaii (where my husband is from), I'd be shipping the cookies, and all the Pokemon cookie cutters that I could find had a Pokemon with a long tail. When I told Kristen I thought the tails might break during shipping, we decided that I could just make the cookies round, with Pokemon's face on them! We also decided to do half the cookies Pokemon, and the other half would be pokeballs! (I actually didn't know what these were at the time, and had to look them up!)


For the cookies, I used my go-to sugar cookie recipe (which you can find in my book, The Hello Kitty Baking Book!), which I chilled, rolled out to 1/8 inch thick, and cut out with round cookie cutters. Then I baked them at 350F for 10-12 minutes, until the edges were golden brown.

Once the cookies had cooled, I made a batch of royal icing (recipe also in my book!), tinted half of it yellow (I used a combination of lemon yellow and golden yellow), and then used stiff yellow icing to pipe the circle outline, before filling it in with runny yellow icing.


Once the icing was dry (I like to let it dry for several hours, or overnight), I used black stiff icing to pipe the eyes, nose, and mouth (complete with tongue hanging out!)


Next came red icing for the cheeks, and a final dot of white in the eyes to make them pop.


For the pokeballs, I started by outlining each cookie with stiff black icing...


... and then piped the details of the pokeball.


Then I filled in the pokeballs with runny white icing in the center and the bottom half of the circle, and runy red icing in the top half of the circle.


And then they were done!


I thought they turned out really cute, even if Pokemon looks kind of abstract! And with the addition of the pokeballs, any kid would know that it's Pokemon, right?


To send them off, I wrapped each one in a cellophane favor bag, tied it with raffia, and carefully filled my shipping box with alternating layers of big bubble wrap, cookies, bubble wrap, cookies, etc., with a double layer of bubble wrap at the top and bottom of the box. And apparently they all made it there with no breakage! Yay!


Happy Birthday, Caleb!

Sunday, February 11, 2018

hungry caterpillar birthday cake with handmade fondant topper


I've had the privilege of making cakes for Doan ever since her son's first birthday (see this circus carnival cake, and this elephant cake for his second birthday), and last summer for his third birthday the theme was The Hungry Hungry Caterpillar! We decided on a vanilla cake filled with fresh strawberries and whipped cream, and a handmade fondant caterpillar topper.

A few weeks before the party, I got started on the topper, as it would need time to dry completely. I started with white fondant, which I tinted several shades of green, and then rolled into little balls (about the diameter of a quarter).


Then I shaped each ball into a square, flattened them a bit, and connected them to form the caterpillar's body.


Then I formed a red ball for his head, yellow and green eyes, and little purple antennae. And a little black dot for the nose, done with an edible food marker. The final step was to insert two toothpicks into the bottom of the topper, so that it would stay in place when it was time to place it on the cake!


When it came time to make the cake itself, I baked up two 10-inch vanilla cakes (used my favorite vanilla cake recipe in my book, The Hello Kitty Baking Book, and did 1.5 times the ingredients), let them cool, and then sliced them in half horizontally to give me four layers.


After filling each layer with freshly whipped cream and sliced strawberries, I covered the top and sides of the cake with a crumb coat of cream cheese buttercream (recipe also in my book!).


Then I let the cake chill in the fridge for half an hour before covering the cake in a final coat of frosting, smoothing it out with a long metal spatula (and a long offset spatula for the top of the cake!)


I also added a beaded border along the bottom of the cake, using a disposable pastry bag fitted with a medium round tip, as well as Doan's son's name in brown frosting (and a "3" since he was turning three!)


The final step - adding the handmade fondant topper!


The toothpicks in the topper helped to keep it nice and stable on top of the cake, but I also added a few dollops of frosting under the topper to help keep it in place.


I also made a few apples and pears out of fondant (with holes in the middle, just like in the book!), to decorate the sides with.


Happy Birthday Roland!