Tuesday, November 12, 2013

funfetti welcome home cake with handmade bunting


Some of you may remember that we spent an entire month of our summer visiting my husband's family in Hawaii (see the bottom of this post for a few pictures from our trip).  What I didn't mention is that when it was time for us to go home, my son Matthew decided to stay and spend the rest of the summer at his grandparent's house in Hawaii. We missed him like crazy and skyped and talked on the phone to him almost every day while he was gone. But he had such a good time, and we were so glad that he was able to bond with his grandparents, cousins, uncles, and aunties!

When it was time for him to finally come home almost 2 months later, we decided that a "welcome home" mini party would be a great way to celebrate his return! So I baked up a homemade funfetti cake for the occasion!


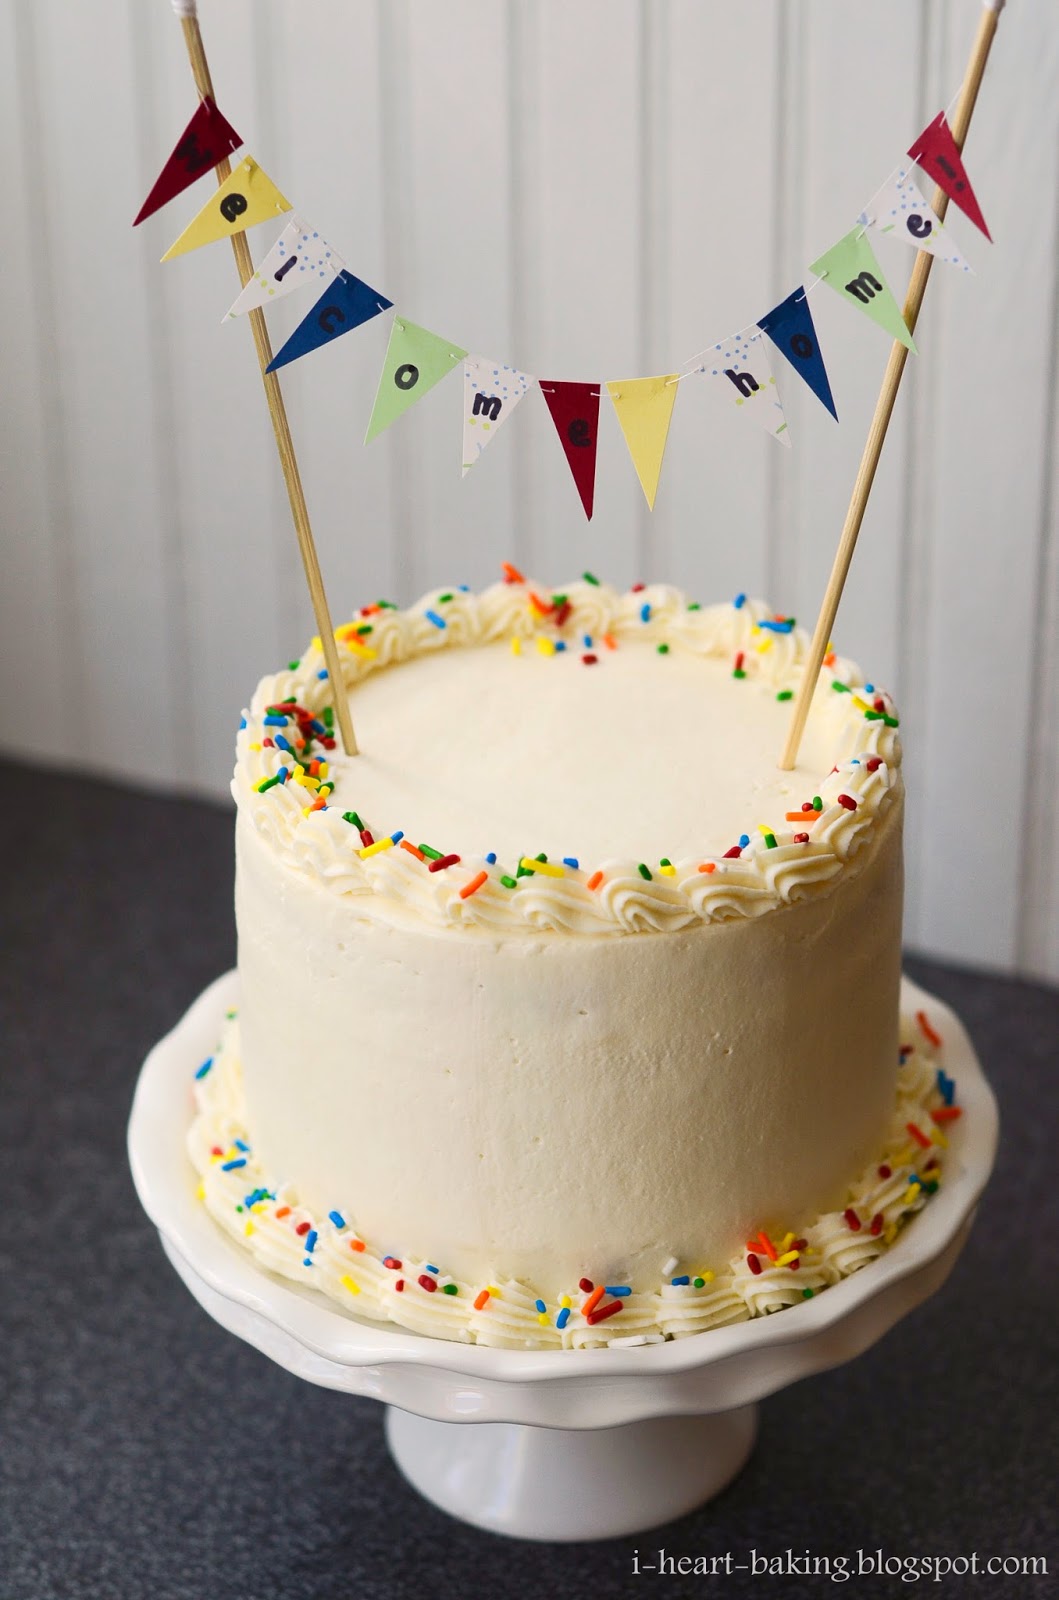
I used this vanilla cake recipe from Sweetapolita (except I use sour cream instead of whipped cream), and added a bunch of colored sprinkles to the batter before baking (although I should have added way more!)


Then I sliced each cake in half horizontally, and filled the layers with freshly whipped cream (giving me 4 layers of cake and 3 layers of whipped cream).


Next, I covered the entire cake with two coats of whipped cream, and then added a decorative shell border on the top as well as the bottom of the cake.


I had recently found these colorful sprinkles (at Target!), and thought they would be perfect - colorful and fun just like the the funfetti in the cake batter!


So I sprinkled them generously along the top and bottom borders.


While the cake chilled in the fridge, I made a "welcome home" bunting to go on top of the cake. I cut little triangles out of cardstock and craft paper, and used a needle and thread to string them together.


Then I attached each end of the bunting to bamboo skewers, before securing the skewers in the top of the cake.


My brother's girlfriend helped us make a matching "welcome home" bunting for the wall decoration as well, and they picked up colorful balloons for the celebration.


Little Melodie was so happy to have her big brother back home again!


Cutting into the cake revealed the lovely layers, however I just wish there was more funfetti on the inside of the cake!


Welcome home, my Matthew! We missed you so much, and it's great to have you home again! :)

Sunday, October 27, 2013

firetruck birthday cupcakes


I'm so sorry for the lack of posts lately!  All I can say is that it's been a crazy past several weeks, and I've been working on an exciting project that I can't wait to share with you more in the next coming weeks!  But more on that later! :) For now, let's talk firetrucks!

Last month, a mom from my daughter's preschool asked me to make cupcakes for her son's birthday. He absolutely loves firetrucks, so we decided that I would make firetruck cupcakes!


After I baked up three dozen chocolate cupcakes, I topped them with a tangy cream cheese frosting, using a Wilton 1M tip to pipe a pretty rose design.


Then I set about piping the firetrucks on top of the cupcakes.  First I divided frosting for the colors I would need - red, black, yellow, and white.


Then using a Wilton #3 tip, I used red frosting to pipe little rectangles (with a notch in the middle) on each cupcake. Then using the same sized tip, I used yellow frosting to pipe the ladder on the side of each firetruck.  Next, I used a slightly larger round tip (Wilton #5) with black frosting to pipe the wheels. And for the final touch, I went back to the #3 tip with white frosting to pipe a dot on each wheel, and a small square for the window.


Despite the fact that they looked like one of my kids drew them, I thought they turned out pretty cute!  And I love the fact that you can eat the entire cupcake, without having to peel off fondant or that type of thing. (Actually, I love to pipe frosting on cupcakes instead of using fondant cut outs - see my Hello Kitty cupcakes, dinosaur cupcakes, duckie cupcakes, jack-o-lantern cupcakes, spiderman cupcakes, thanksgiving turkey cupcakes, etc ...)


Happy Birthday, Ethan! Hope you had a fun birthday party and enjoyed all the firetrucks!

Monday, September 2, 2013

cherry vanilla hello kitty bow birthday cake


After my recent obsession with making dark cherry ice cream, I decided to include those same cherry flavors in the birthday cake that I baked for myself this year! So I baked up my favorite vanilla cake recipe, and waited for them to cool before slicing them in half horizontally.


I've seen cake recipes before which use a simple syrup brushed over the cake layers, in order to keep the cake moist and add extra flavor.  Since I had cherry syrup leftover from when I drained homemade candied cherries for the dark cherry ice cream, I decided to brush the cherry syrup onto my cake layers.  And then I topped each cake layer with cherry whipped cream (freshly whipped cream with the same cherry syrup added to it).


Then I colored the rest of the frosting a soft pink, did a quick crumb coat and a smooth final coat of frosting, and added a quick shell border to the top and bottom of the cake.


At the time (I made this cake in April and only now got around to posting it!), my newborn was only 2 months old, so the decoration had to be simple given my limited time.  I simply added some rainbow sprinkles, and piped on a quick Hello Kitty bow (my favorite part of last year's birthday cake).


When I cut into the cake, I was dismayed to find that the cherry syrup had turned a purple-blue color, instead of the lovely shade of burgundy that I had brushed on!  But it did add more cherry flavor to the overall cake, as the amount of cherry syrup in the whipped cream was barely detectable.


Happy (belated) birthday to all of you April babies out there!


*** Update:
You can now find the recipe for a strawberries and cream version of this cake in my new book, "The Hello Kitty Baking Book"! Enjoy!

Sunday, August 25, 2013

pastel hello kitty cookies, macarons, and bow cupcakes for a bridal shower dessert table


Way back in December of last year, I was contacted by a bride-to-be named Julieta, who had been following my blog and asked me about making goodies for her bridal shower dessert table.  When I found out that: a) she wanted Hello Kitty themed desserts, and b) she lives about 10 miles from me, I couldn't refuse!  At the time I was still pregnant with my third baby and due in February, but her bridal shower was set for April so I convinced myself that it would be fine, since my newborn would be about 2 months old by then.  But boy oh boy, when April rolled around, I was not prepared for the amount of work and lack of sleep that I was in for!


In the chunks of time that I had available for baking, I started with the cookies, since they could be made days in advance and would still be fresh.  We had decided on Hello Kitty cookies with pastel bows, as well as "J" and "D" monogram cookies after the bride and groom's names.  So I found all the cookie cutters that I would need, and baked up my favorite sugar cookie recipe.


For the Hello Kitty cookies, the steps were pretty much the same as the Hello Kitty cookies that I made last summer, except this time the bows would be pastel shades of mint, yellow, and peach.


As for the "J" and "D" cookies, she had decided on pastel mint and peach for the letters, with a white beaded border (just like the monogram cookies that I had made last year for my cousin's wedding favors).


Next up were Hello Kitty macarons, which could be made 2 days in advance, especially since the macarons needed "age" for at least 24 hours in the refrigerator to ensure the proper consistency.


See links here, here, and here for tutorials on making my Hello Kitty macarons.


Once the cookies and macarons were done, I only had one more dessert to make - mini cupcakes decorated with Hello Kitty bows!  These I made the night before her bridal shower.  I started with my favorite chocolate cake recipe, which I baked in mini muffin tins and liners.

For the frosting, I whipped up my favorite cream cheese frosting, and divided it in portions to be colored pastel mint, yellow, pink, and peach.  Then I used white frosting to outline my Hello Kitty bows, and filled them in with little dots of colored frosting, using a small round Wilton tip #3.


And then I was finally done.  After an entire week of juggling three kids and baking nonstop, I could finally rest.  Well, as much as one could rest with a 2-month old newborn, but that's another story.  It was all worth it though, because I loved how all the desserts looked together in the end!

Happy bridal shower, Julieta!  Hope you enjoyed the goodies!


*** Update:
You can now find my recipes for Hello Kitty Macarons, Hello Kitty Cookies, and Hello Kitty Mini Cupcakes in my new book, "The Hello Kitty Baking Book"! Enjoy!

Sunday, August 11, 2013

pink ombre rose cake


A friend of mine contacted me a couple months ago about making a pretty cake for her friend's baby shower, and of course I couldn't refuse!  We decided on a 6-inch pink ombre rose cake, where the inside would be pink ombre layers as well.  So I used my favorite vanilla cake recipe from Sweetapolita, and divided the batter into thirds.  One was colored a deep pink, the second a soft pink, and the third I left white.


Once the cake layers were baked and cooled, I made a small batch of freshly whipped cream for the filling.  Then I began assembling my cake - dark pink cake layer on the bottom, whipped cream, soft pink layer in the middle, more whipped cream, and then topped it with the white cake layer.  Then I whipped up a batch of cream cheese buttercream, and did a quick crumb coat over the entire cake.


I divided the remaining frosting into thirds and colored them to match the cake layers.  And then I was ready to start piping my roses!


This is one of my favorite cakes to make, as you can tell from all the past rose cakes that I've made - see links for my lavender rose cakewhite rose cake with red velvet and cheesecake insideorange pumpkin rose cake, and purple ombre rose cake - all done following this awesome tutorial from I Am Baker!


I hope the guest of honor liked her cake!!!

Sunday, August 4, 2013

camouflage pom pom cake


For my husband Grant's birthday last year, I made him this camouflage petal birthday cake.  I had wanted to make him a "manly" cake, but I guess the term "petal cake" isn't so manly!  This year I decided to make him another camouflage cake, this time using a "pom pom" effect that I saw on here on Pinterest, which eventually led me to this I Am Baker cake!  Even though the term "pom pom" isn't exactly "manly" either, I had the idea in my head and I couldn't shake it.  So I bought a bunch of Wilton grass tips and I was on my way!


I started by baking a 6-inch vanilla cake, and 6-inch chocolate cake.  After they had cooled, I sliced them in half horizontally with a serrated knife.  Then I whipped up a big batch of fresh whipped cream.  I took a portion of the whipped cream and mixed it with chopped Oreo cookies, and used that to fill the cakes.


First I placed a layer of chocolate cake on my cake round, then piped a layer of the Oreo whipped cream and smoothed it out with an offset spatula.  Then came a layer of vanilla cake, followed by more Oreo whipped cream, then another layer of chocolate cake, more Oreo whipped cream, and then finally the last layer of vanilla cake.


After covering the cake in a quick crumb coat of the whipped cream, I divided the rest of the frosting into portions to be colored brown, black, green, and olive drab green.  As with last year's cake, I used cocoa powder to help color the brown and black frosting in order to minimize the amount of food coloring I was using.


Once the frosting was colored, I fitted my piping bags with my new grass tips and filled the bags with the different colors of frosting.  And then I started piping my pom poms!


As I was piping away, several of the pom poms came out looking like messy blobs.  It could have been because my frosting was getting too soft, or because the tips were getting clogged, or because I was using whipped cream for frosting!  But I only had a limited amount of time, with a three-month old newborn at home, and a husband and our other two kids who were about to come home to an unfinished cake!  So I kept piping away, trying to clear my piping tip and cool down my frosting in the fridge as often as I could.


Although the cake turned out messier than I would have liked, it still tasted delicious with it's cookies-n-cream goodness!


Happy birthday, my love!