Friday, December 14, 2012

my first wedding dessert table!

I'm so excited to finally reveal (in full) the wedding dessert table that I worked so hard on a couple of months ago!  Cherish, the bride, was such a joy to work with, and is seriously one of the sweetest and thoughtful people I have ever met!  She had envisioned a classic rustic wedding, and handmade many of the wedding details, down to the paper doily flower chandelier that hung above the dessert table.  Her wedding color scheme was greens and blues, so when I arrived the dessert table was laid out with a bright blue tablecloth, ready for me to decorate with goodies!

First up were my Hello Kitty macarons.  I decided to display these in gallon-sized giant glass jars so that we could see all the cute Hello Kitty faces peeking out, and also so that they would also stay fresh in the contained jars.


Next up were the potted plant chocolate puddings.  I had decided to display them on either side of the dessert table - one one side of the table they would be stacked on a two-tiered ruffled cake stand, and on the other side of the table I used a single tier white milk glass cake stand.


Next came football-shaped and tooth-shaped cookies, which I displayed on four long white rectangular platters, side by side.


And finally the mini s'mores cupcakes, which I served on a white square three-tiered pedestal cake stand, right in the center of the table.


To sum it all up, here is my initial sketch of what the dessert table setup would look like:


And this is how the dessert table ended up!


This was seriously one of the funnest and coolest things that I have ever taken part in, and I'm so glad that Cherish asked me to do it!  Thank you, Cherish!

And now, a few images from Cherish's classic rustic dream wedding!


Congratulations, Cherish and Steven!

Friday, December 7, 2012

mini s'mores cupcakes


This is last dessert in my series of posts on the goodies that I made for Cherish's wedding dessert table.  (In case you missed them, I also made Hello Kitty macarons, football and tooth cookies, and potted plant chocolate puddings).  Cherish had wanted some kind of cupcake on the dessert table, and since s'mores were one of the things in her "list of likes", we decided on mini s'mores cupcakes.


I ended up using an adaptation of a recipe that I had previously used, except I used my favorite chocolate cake recipe, and a different frosting recipe.  And since I was making mini cupcakes, I didn't think the graham cracker crust on the bottom would fit, so I just sprinkled crushed graham crackers on top of the batter before baking.


Once the mini cupcakes were baked and cooled, I made a marshmallow frosting (this time, a Swiss meringue frosting).  I used a large open star tip to pipe the frosting onto the cupcakes, and then used a creme brulee torch to lightly brown the frosting.


While I thought the cupcakes were was delicious and marshmallowy the night they made, by the next day (the day of the wedding) I bit into one and felt as if the frosting had become light as air.  That wasn't necessarily a bad thing, but I had wanted the frosting to retrain it's gooey marshmallow texture.  So next time I think I'll try an Italian meringue frosting, as I've read it tends to be more stable than a Swiss meringue frosting.


And finally, a sneak peek into how I displayed these minis - on a beautiful three-tiered square pedestal cake stand!


Stay tuned for my summary post on the wedding dessert table!

*** Update: You can see a summary of the wedding dessert table here!

Wednesday, November 28, 2012

football cookies and tooth cookies


Along with the Hello Kitty macarons and potted plant chocolate puddings that I made for Cherish's wedding dessert table, I also made sugar cookies decorated with royal icing.  Since her groom loves football, she asked for football shaped cookies.  And she also asked for tooth shaped cookies, since she is a dental student!  She even sent football-shaped and tooth-shaped cookie cutters for me to use!  This bride thinks of everything!


Since I was making 75+ cookies total (I always make extra to allow for mess-ups!), I ended up making 3 batches of cookie dough, and 2 batches of royal icing.


After the cookies were baked and cooled, I started on the decorating.  For the football cookies, I first outlined my football by piping with brown stiff icing, and then filled it in with brown runny icing.  I let that dry for a few hours, and then used white royal icing to pipe the football laces on.


For the tooth cookies it was a similar process - I first piped an outline with white stiff icing, and then filled it in with white runny icing.


Once that was dry, I piped an additional white outline to finish it off.


And on the dessert table, I displayed the cookies on long white rectangular platters side by side.


Stay tuned for the next post on the last of the dessert table goodies!


Tuesday, November 20, 2012

potted plant chocolate puddings


In addition to the Hello Kitty macarons that I made for Cherish's wedding dessert table, I also made chocolate puddings that were topped with oreo crumbs and a mint spring, made to look like a miniature potted plant!  These adorable desserts were the bride's idea, and inspired by ones at Martha Stewart Weddings.


First up was the chocolate pudding itself, for which I used a combination of Guittard semisweet and Ghiradelli bittersweet chocolate chips.  After cooking the pudding on the stove, it turned into a very smooth, decadent, and luxurious chocolate pudding indeed!


While the pudding was still warm, I carefully poured them into little shot glasses, which I then placed on large baking sheets to set in the fridge.


Then the next day (the morning of the wedding), I made my oreo crumbs in the food processor, and then covered the puddings with the freshly ground "dirt".  Finally, I placed a fresh mint sprig in each one, followed by a cute little wooden spoon (which can be found here).


Unfortunately by the time we drove to the wedding venue (which was 3 1/2 hours away), all of the mint sprigs had wilted!  But thanks to my genius hubby, who had bought potted mint plants that morning for "emergency use", we were able to replace all the wilted mint sprigs with freshly picked ones!


And here's the sneak peek at how I set these up on the dessert table!


Stay tuned for the rest of the dessert table goodies!

*** Update: click here to see the Hello Kitty macarons for the dessert table, and here to see the football cookies and tooth cookies!

Tuesday, November 13, 2012

hello kitty macarons for a wedding dessert table


Sometime last year, Cherish, a friend of a blogger friend of mine, contacted me about doing a dessert table for her wedding.  I had never done one before, but I told her I was willing to try!  She wanted to have a classic rustic wedding, and after we exchanged a few brainstorming emails she decided she definitely wanted my Hello Kitty macarons on the table, among other things!

A year flew by, during which we exchanged many emails, until finally it was a week before the wedding!  I had scheduled my week around the baking that I would need to complete, and for the Hello Kitty macarons I started on them 2 days before the wedding, as they would need at least 24 hours in the fridge to "develop". 

The first time I made macarons, it was quite a process!  Grinding almond meal, aging egg whites, etc.  You can read about it in this post, but since then I've gotten a little more used to the process.  I've also switched to using raw slivered almonds when making my almond meal, which saves lots of time!  (Although you could also just buy almond meal, but I prefer to grind my own!)

I like to use the Italian meringue method, where you make a hot sugar syrup on the stove, and then slowly pour it into whipped egg whites to help stabilize the meringue.


Then you continue whipping the egg whites until you get a stiff, glossy, beautiful Italian meringue!


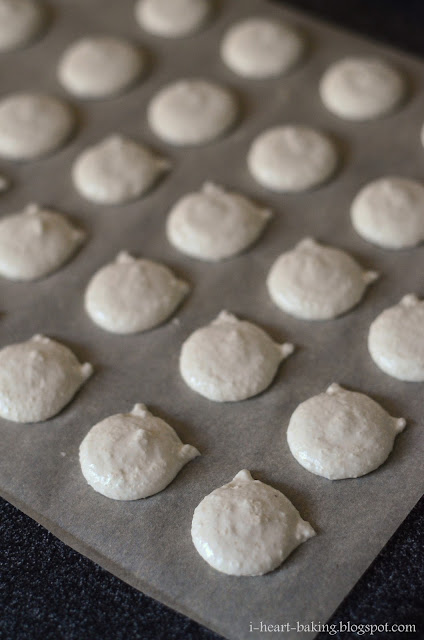
Then you mix in the rest of your ingredients (almond meal, confectioner's sugar, and more egg whites) and fold them until you get the right consistency (until it "flows like lava"), and then fill a piping bag and pipe out circles of batter onto a silpat or parchment paper.


The first time I made my original Hello Kitty macarons back in June of 2011, I made the ears by using a toothpick to pull out the batter (based on a method I saw at 6Bittersweets where Xiaolu made lemon-shaped macarons).  But this time I decided to also try piping out the ears to see how it would look.


I liked it and it was much more time efficient than pulling out ears with a toothpick, however I think I still prefer the toothpick method better - they look more like ears!


But either way, they are still cute once Hello Kitty's face is drawn and bow is attached!  (See my original Hello Kitty macaron post as well as my post on rhubarb Hello Kitty macarons for more info on how I do this).


When all the shells were baked and cooled, I made a fresh strawberry cream cheese filling to fill them with.


I ended up making more than 150 macaron shells, which turned into 75 plus assembled macarons - I always make extra to allow for mess-ups!


Stay tuned for more posts on the rest of the wedding dessert table goodies!  I'll also have a post on the final set up of the dessert table, but here's a sneak peak on how I displayed these babies!


*** Update: click here to see the potted plant chocolate puddings for the dessert table, and here to see the football cookies and tooth cookies!

*** More updates:
You can now find my recipe for Hello Kitty Macarons in my new book, "The Hello Kitty Baking Book"! Enjoy!

Tuesday, November 6, 2012

baked pumpkin donuts


Last year for Halloween, I made fun jack-o-lantern cookies, based on jack-o-lanterns that we had actually carved at our house.  And the year before, I made jack-o-lantern cupcakes with a spiderweb frosting.  But this year, I didn't have time to make anything elaborate!  I was, however, able to whip up a quick batch of baked pumpkin donuts on Halloween Day!


I've been meaning to use these donut pans that my friend Reggie gave me for Christmas a while back, but never had a chance until now!  For the donut batter, I found a great recipe at Kirbie's Cravings, and they were a breeze to make!  You basically just combine all the wet ingredients, and then add the dry ingredients, and then you're done!  


After filling the donut pans 3/4 full, I baked them for 15 minutes and they were done.


After they cooled for a bit, they went for a quick dip in a cinnamon and sugar mixture.


And then, they were ready to be eaten!  


They turned out really moist and flavorful, had great texture, and were full of pumpkin flavor.


I shared a few with my neighbor Cindy, and I just love the picture that she posted on Instagram!


I had enough batter to make some mini donut as well, using this pan (also from Reggie - thanks Reggie!)


One thing to note is that these donuts are best eaten the day they are made.  I ate some the next day and they were quite soggy.  But it wasn't anything that a quick dip in cinnamon sugar couldn't fix! :) Perhaps next time I'll store them unadorned and then dip them in cinnamon sugar until right before serving.


One last note, I also used the same batter to test out baking them in muffin tins, topped with a brown sugar and cinnamon crust before baking, and these still tasted great the next day!  

Enjoy!