Monday, October 17, 2011

superman cupcakes


My son Matthew had three different celebrations for his fourth birthday!  Lucky boy!  First, we went out for jamba juice (his favorite) and a pizza dinner the evening of his actual birthday.  Then that weekend, we had a big party for him with Superman cake and Superman cookie favors.  And in between those two celebrations, we also had a party at his preschool with all of his classmates!


For his class party, I made vanilla cupcakes (using the same recipe as his Superman cake), and topped it with a swirl blue cream cheese frosting.  I also initially wanted to fill the cupcakes with strawberry whipped cream, but I ran out of time and dropped that idea when it was about 1am and I wasn't done making the cupcakes yet!


The final touch was a Superman logo that I had piped with royal icing ahead of time.  It was exactly like piping royal icing on a cookie, except that I piped it on waxed paper instead!  And then I just peeled them off (carefully) and placed them on top of the cupcakes.


While I watched the kids eat their cupcakes, I realized that they all had almost the same strategy - first, carefully remove the Superman logo and devour it.  Then lick all of the frosting off of the cupcake.  Finally, eat the cupcake (although most of them just licked off all the frosting and the went off to play!)  But I was proud of my Matthew, he ate his entire cupcake!  (Which meant that he liked it, since he normally doesn't like cake).


I also made a SUPER MATTHEW banner to decorate the classroom with, and my husband made a Superman pinata (well, he actually patched one up an old one).  But more on that in my next post. :)

Hope you had a wonderful birthday, Matthew!

Thursday, October 13, 2011

superman cookies


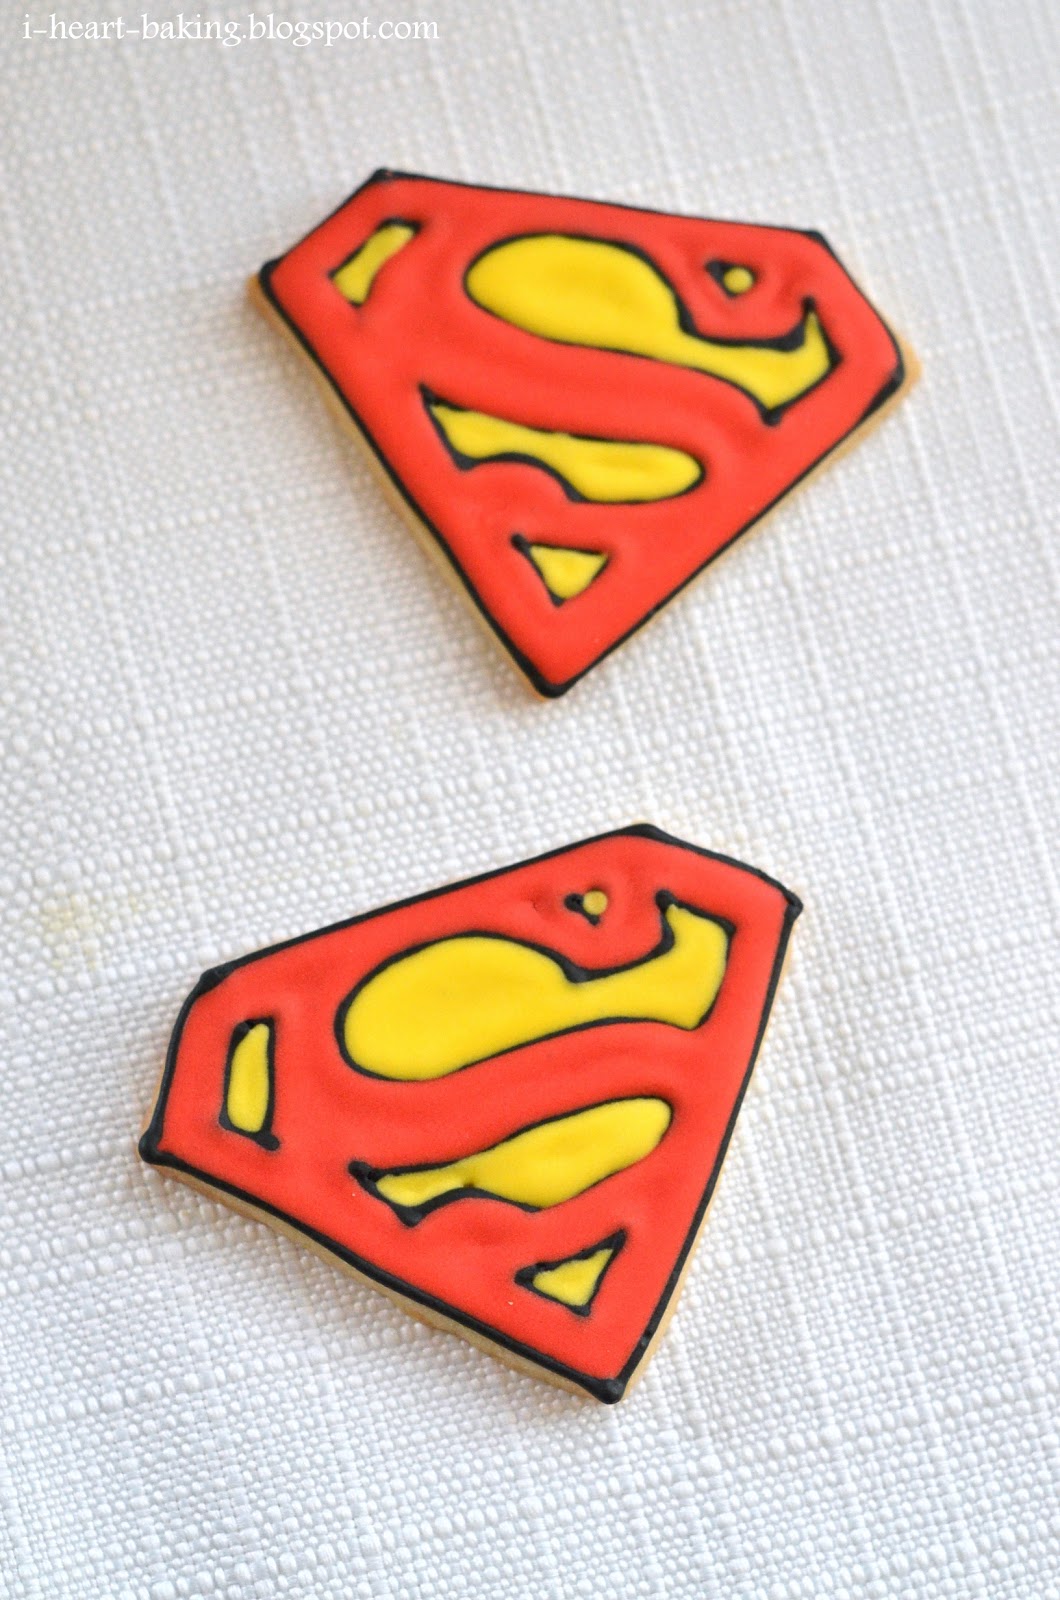
To go along with the Superman cake that I made for my son Matthew's 4th birthday, I made Superman cookies to include with the party favors.  Originally I was going to just do letter cookies ("M" for Matthew) as well as a Superman logo piped onto a round cookie, but my husband offered to make me a custom Superman logo shaped cookie cutter, and of course I couldn't refuse!


Once the cookie cutter was ready (it took him about 5 minutes to make this one!), I made my favorite homemade sugar cookie recipe and cut out my Superman logo cookies.  After the cookies had baked and cooled, I piped the Superman logo detail in black royal icing, and the filled it in with red and yellow royal icing.


I also made the originally planned round cookies with the Superman logo piped on top, which was inspired by Matthew's favorite Superman t-shirt.


Matthew loved the cookies, and I hope everyone else at the party did too!


Saturday, October 8, 2011

superman birthday cake - white cake filled with whipped cream and strawberries and covered with cream cheese frosting


My son Matthew normally doesn't like to eat cake.  I know.  I don't get it either.  But we were recently at his friend's birthday party, and when all the games had ended and it was time to eat, he finished his pizza and then promptly told me he wanted to go home.  I said we couldn't leave until we'd had birthday cake, to which he declared he didn't want any cake!  I told him that he didn't have to eat any of it, but that he had to stay long enough to sing happy birthday and watch his friend blow out the candles.

When his friend's mom was passing out the cake, she offered me two slices, but I only took one and told her that we'd share (since I knew Matthew didn't want cake).  But when he saw that the cake was filled with whipped cream and strawberries, he asked if he could eat my strawberries.  After he had eaten all the strawberries off of my plate, he still wanted more.  So I got him his own piece of cake, and to my surprise he devoured the whole thing, cake and all!  And that's when I knew what kind of cake I would make him for his birthday.


I used the same white cake recipe as I did for his dad's "heart surprise" birthday cake,  and since I was making a 12 x 18 inch cake I had to make four of these in 9 x 13 pans!  (Which took quite a long time since I made them one at a time and the batter is more complicated than my regular cake recipes, as it requires folding in whipped egg whites to make the cake fluffy).


After baking and cooling all four cakes, it was time to assemble.  I placed two of the cakes side by side after slicing off the connecting edges, and then covered it with a thick layer of homemade whipped cream.  Then I topped that with sliced strawberries, and then another layer of whipped cream.


After letting it set in the fridge, I topped it with the last two cakes, and then covered it with blue cream cheese frosting.  Now here's where I realized my mistake in judgement.  While I love the taste of cream cheese frosting (especially compared to buttercream), it just doesn't hold up as well as buttercream.  And no matter how many times I tried to smooth out my cream cheese frosting, it was just gloppy.  And runny.  And melty.  I think on a regular 8 inch cake it would have been fine - but on a gigantic 12 x 18 inch cake?  There was no way I could get it to work.  Next time I make a cake this large, I'm definitely using buttercream!!!


But it was too late, and I had to just roll with it.  So I piped my superman logo outline in black, and then filled it in with red and yellow frosting using a star tip.  I wanted to do some sort of decoration on the sides, but my favorite basketweave design just didn't seem to fit with the whole Superman theme.  So I just used a frosting comb to make a design on the sides.  And then it was time to pipe the border in white.  But since my frosting was already goopy and melty, the border on the top edge started drooping (sigh).  But at this point it was past 3am and I was too tired to do anything about it.  So I just left it alone.


In the end, it didn't matter anyway, because while driving to the party we had to brake really hard at one point, and most of the borders got smashed against the box!  Argh!


When I finally tasted the cake, I loved the combination of all the flavors, but I thought the cake itself was a little bit dry.  However several people asked for seconds, so I guess they must have liked it?  And most importantly - the birthday boy loved it.  And that's all that really matters, right? :)


*** Update: I also made Superman cupcakes and cookies!  You can find the cupcakes here, and the cookies here!

Wednesday, October 5, 2011

coffee bean ice cream


My friend Reggie's husband LOVES coffee ice cream, and since they were coming to visit I wanted to make them a batch.  Normally I make my coffee oreo ice cream for them, but this time I wanted to try serving them a new coffee bean ice cream recipe that I found in my David Lebovitz ice cream book.  I had made it once over the summer and I think I like it even better than the coffee oreo!


This ice cream starts with infusing warm milk and heavy cream with whole coffee beans.  I let mine steep for over an hour before continuing with cooking the egg yolk custard base.  The final step was to add a teeny bit of finely ground espresso bean before letting that mixture sit in the fridge until cold, and finally churning it in the ice cream machine.


I love the look of the flecks of ground espresso bean!  And the ice cream came out smooth and creamy, and rich with deep coffee flavor.  I hope this becomes their new favorite coffee ice cream too!


Thursday, September 29, 2011

elmo cupcakes and elmo ice cream cake


I can't believe my little boy Matthew turned four today!  Last year I made Cars cupcakes for this third birthday, and the year before that I made these Elmo cupcakes for his second birthday (please excuse the poor lighting on these old pictures!).


I made two dozen of these and served them at his preschool birthday party - chocolate cupcakes using my favorite homemade chocolate cake recipe, with a quick cream cheese frosting, and plastic Elmo rings as toppers so the kids could play with them after they were done eating their cupcakes.


Then that weekend, we had a small party at Chuck E Cheese, and I made my first ice cream cake ever.  It was a layer of chocolate cake, with a layer of homemade mint oreo ice cream ...


... and topped with vanilla buttercream.  And then I piped Elmo on top.  It was my first time piping a character, so it could have used some work.  But it was freehand!  And my first Elmo.


In any case, this started an obsession with making ice cream cakes (most of them Hello Kitty cakes).  Although now that we have two kids, ice cream cakes have fallen to the bottom of my to-do list when it comes to baking.  They just take so long!  And they are high maintenance, mainly because you have to constantly return the cake to the freezer several times in between piping, in order to keep the ice cream layer from melting.  Not to mention the complications with transporting an ice cream cake!


This is like the only picture I have of the inside of the cake, but you can get an idea of what it looked like.


This year Matthew requested Superman for his birthday, so stay tuned for some upcoming Superman goodies!

Monday, September 26, 2011

hello kitty cake


My friend Helen has a friend Alysa who asked me to make a Hello Kitty cake for a bridal shower she was planning.  I had made the same cake for my daughter's first birthday, as well as a piggy cake using the same cake pan.


This time I made two layers of chocolate cake, and a strawberry whipped cream to go in between to two layers.  I've made whipped cream filling to go inside of chiffon cake in the past, but never for a more dense cake like this chocolate cake.  I had seen a recipe somewhere for stabilized whipped cream, which had dissolved gelatin added to it, so I thought I would try that to keep the whipped cream firm.  But when I tried it out, the whipped cream came out soft and gummy - perhaps I added the dissolved gelatin too soon?  So I ended up making a second batch of my regular strawberry whipped cream - hopefully it held up!


After filling and stacking the two layers, I did a crumb coat of cream cheese frosting.  Then I piped the eyes, nose, bow, and whiskers.  And finally I filled in the entire face with a star tip.


When Alysa came to pick up the cake, we both thought each other looked familiar - and after talking a bit, it turned out that we went to the same high school!  What a small world!


*** Update:
You can now find my recipe for Hello Kitty Shaped Cake in my new book, "The Hello Kitty Baking Book"! Enjoy!

Wednesday, September 21, 2011

watermelon cake


I know it's not a real cake, but when I saw this post on Martha Stewart's watermelon cake, I thought it was too cute and knew that I had to make it!  Just recently, my hubby brought home a watermelon when he went shopping for dinner ingredients, and that night I carved my watermelon cake.


The method is to cut the watermelon into thirds, with the middle section being the cake.  Then cut the round section into slices, just as you would slice a round cake.  Finally using a melon baller, cut round balls out of the flesh at the ends of the watermelon, to decorate the top of the "cake".


To serve, just place a slice on a plate and top with a few of the melon balls.  It was so easy and such a cute way to serve watermelon, and the kids loved it too!


*** Update: The kids liked it so much, that I made another one the following week!  Here are some of the pictures:


Monday, September 19, 2011

thomas the train cookies


My best friend Sue has a friend who asked me to make Thomas the Train cookies as favors for her son's birthday party, and while it sounded like it would be a complicated cookie to do, I was up for the challenge!  There were two specific things that she wanted for this cookie - she wanted it to be a really vibrant blue, and she wanted it to be a front view of Thomas the Train.


I had initially bought a cookie cutter of a side view of Thomas the Train, but when it turned out that she wanted the front view, I asked my hubby to make me another custom cookie cutter.  (Isn't he the best?!)


After cutting out and baking the cookies using my favorite homemade sugar cookie recipe, I used black royal icing to pipe my borders, and then filled in the various colors in each section (kind of like paint by numbers!).  This was by far the most complicated cookie I've made so far - usually my cookies only have 2 to 3 colors, but this one had 6 different colors!


I let the icing dry overnight, before adding the details such as the lights and the face.  It took me a while to get the expression in his face just right, so I had several mess-ups to eat (and hand out to my neighbors and my coworkers the next day).


Once everything dried completely, I wrapped each cookie in a cellophane bag and tied them with raffia and custom favor tags.  In the end I thought I had made the blue icing a little too blue, but I guess that's better than not being blue enough?  I also thought there were too many black lines everywhere, which made it look too much like a coloring book.  So next time I think I'd pipe the borders in the same color as the filled icing.


Hope the Thomas the Train party was a hit!